SIV Course - Annecy
Accommodation &
Meeting Point
· Airtrips
Staff are staying in Doussard – You are responsible
for your accommodation and we recommend that you too stay at the Lac Bleu. We
will set up a Telegram group to help you organise chalet
sharing if you wish to do so.
· Our minibus collects from Geneva French side – P21 rental car drop
off car park.
· We will muster at the SIV landing area each morning for the initial
pre-flight briefing. The time of the meeting will be advised on the day beforehand
and is subject to the weather.
Flying Site
· SIV take-off at the Montmin Col de Forclaz launch.
· Landing site - the new SIV lakeside landing field, Doussard.
· Hazards – road between lz
& lake, trees behind lz, the lake! Other pilots.
· We may need to wait for anabatic flow to establish before we can launch.
Strong anabatic flow will generate a lake breeze, which may become too strong
for safe flight around lunchtime.
· Katabatic
flow (back wind) may shut down the launch before dusk.
· There is likely to be some snow on the mountain. Bring warm clothes.
You will need
· Glider – you are responsible for ensuring that the glider is
airworthy, with particular attention to porosity, line lengths and cloth tear
strength. If your glider was certified with collapse lines, we suggest that
they be fitted for SIV.
Read the manual – if certain manoeuvers
are not advised you should not perform them.
· Harness – you will need to remove or disable the back protector
for the SIV flights. Don’t leave your protector in our bus because they get
lost and mixed up. The harness must be airworthy and strong enough to SIV.
Check it carefully before we leave the UK on Friday lest we need to bring one
for you to hire. Some composite seat plates are not suitable for SIV and should
be replaced with plywood ones. Your waist strap must be set appropriately.
· Reserve – this must be
big enough, not so long that the main canopy would interfere with opening and must have been repacked within the last
three months. We may be able to repack reserves there, but cannot guarantee the
cleanliness of the packing area. We will check reserve deployment systems prior
to SIV flights.
· Radio - we will be using 2m
radio. You will be expected to bring your own, but we
can hire them out if booked ahead. I recommend a waterproof radio, but a case
may work…
· Vario
– we will be free flying if the opportunity arises, so it’s nice to have
a vario.
· A change of clothes & shoes/boots…
· A four gang adapter is good for charging toys
· Medevac
Insurance is obligatory, available from Airsports
Insurance and elsewhere.
Transport
We
have our minibus and will have a car.
Time
to launch about 30 mins
Number
of flights per day is dependent mainly on launch adroitness.
Boat
If
you do go into the water:
DON'T
PANIC - your buoyancy aid will keep you afloat indefinitely.
Keep
your helmet on.
Look
for the boat and raise one arm to signal the coxswain that you require rescue
Try
to avoid kicking your legs else they will get tangled in your lines.
Don't
swim towards your wing or reserve
The coxswain will advise you of the best method
for boarding the boat, usually over the stern.
Video
We plan to video all manoeuvers.
However, staffing & technical limitations may restrict our ability to do
so.
We aim to show the video footage at the end of
each day's flying, particularly if anyone struggles with any manoeuver.
A badly edited SD of the course will be given to
all participants.
Luggage
We will
be making our first familiarisation flight as soon as
you get to Annecy, so please ensure that any non-flying kit can be quickly
separated from your glider and that you can track down all required kit
promptly.
Manoeuvers
· Big ears
· Bunny ears (glider dependent)
· Asymmetrical deflations
· Symmetrical deflations
· B-line stall
· Spiral Dive
· SAT spiral dive (not the SAT!)
· Full Stall
· Spin
· Stall exit from Spin
· Wing-overs
· Accelerated asymmetrical deflations
· Accelerated symmetrical deflations
·
Pitch induced deflation
·
Turn reversal
I strongly recommend that you watch Instability 2 until you can
regurgitate the entire script.
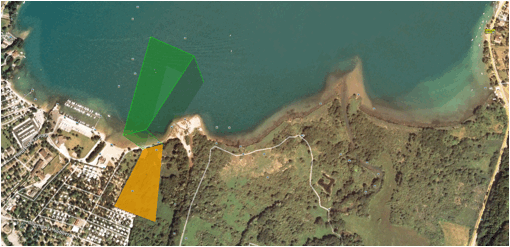
Manouvering area in green, landing area in orange. DO NOT fly over the nature reserve to the east of the Launch
General
Information
During the course
·
Only perform manoeuvers over the lake and in the box!
·
You MUST wear your buoyancy
aid when there is ANY risk of landing in water.
·
You MUST remove your back
protector when there is SIGNIFICANT risk of landing in water, i.e., when
performing SIV manoeuvers. (Airbag systems must be
disabled)
·
Please do not attempt any manoeuver for which you have not been briefed during your
pre-flight briefing.
·
Limit partying - you do
need to be awake & not hung over…
·
Please avoid any drugs,
recreational or otherwise. If you are taking any prescription medication,
please obtain clearance to operate 'heavy machinery' and ensure that you have
advised me prior to any flight.
· You are recommended to use a waterproof radio pouch. Headset leads may
compromise watertightness.
Ready Pilots are clipped in & holding
mushroomed gliders! Please unpack
& check your glider promptly on arrival at launch, even if it looks like
there may be a wait for a weather window or some other delay.
What could possibly
go wrong?
Cravat
Caused when your glider side-slips,
such as in an asymmetrical stall recovery, accelerated asymmetrical deflation
or when hit by a gust from the side. The wing tip weaves its way in amongst the
lines and becomes trapped. In worst case scenario, it
is held flat against the direction of airflow, behaving like a large air brake.
The result can be a violent spiral dive, colloquially known as a death spiral…
Normally difficult to
induce.
An optional manoeuver,
it is most readily entered by full stalling, then releasing one brake ahead of
the other or by poor co-ordination during a wingover.
To recover:
If the cravat is quite small, you may be able to
limit the turn to a lazy 360 or better by application of countering brake.
If you have time on your hands, find the stabiliser line and pull it in to unravel the wing tip.
If the cravat is larger, pull and release a big
ear, this may clear it or it may be possible to fly the glider to a safe(r)
landing with big ears applied.
If the cravat is larger still, pull and release
an asymmetrical deflation, this may clear it or it may be possible to fly the
glider to a safe(r) landing with a deflation held in.
If the cravat is larger still, slow the glider
to approach the stall. Just before stalling the wing tip may unravel,
alternatively, you may have to enter a fully established stall to recover it.
If it is not possible to clear the cravat or if
you do not have height in hand you should consider your reserve…
Death Spiral
Any fully established spiral dive will almost certainly kill you if you hit anything,
including water.
You must pull out of the spiral - you may need
to use both hands on the outside brake.
If necessary stall
the glider.
If necessary deploy
your reserve.
Line twists
These occur when you have your chest strap set
too tight &/or you encounter a rapid change of rotation, such as with a
serious cravat. Leaving your legs out in front will increase the risk of this
occurring; Tuck your legs under you.
Deal with any spiral first,
even hitting water in a spiral can be fatal.
If necessary stall
the glider.
Typically you can apply brake when lines are
twisted but you cannot release them again until the twists are out!
Sometimes you may be able to reach above any
twists for the brake lines.
Having established straight & level flight, then attempt to kick out the twists. Reaching above the
twists should allow you to rotate yourself.
Is it Spiralling or Spinning?
Is
it a spin or an asymmetric deflation?
It
is unlikely to be spinning unless you stalled one side.
If
you suffered a deflation, then it is spiralling
You
must learn to recognise the difference, because the
corrective actions are opposite!
In
a spiral, the G forces can be very high
In
a spin, G forces are usually low, the world just
rotates around you!
Counter
brake any spiral.
Release
brake to allow a spin to recover
A-Line Stall or front
rosette
A dated rapid descent technique. Can
occur from a symmetrical front deflation.
Some
gliders may rotate rapidly in this configuration!
To
generate: Take the inner A line from each front riser and
pull down.
The
wing tips will come together, forming a front rosette
The glider stalls and descends fairly rapidly
To recover: release the lines and the glider should spontaneously recover. You may
need to pump the brakes briskly once.
Be prepared to damp the dive
Reserve Deployment
The
instruction to deploy your reserve will be given three times, followed by three
tone bursts on the radio. Look for the reserve handle then putting your thumb
into the handle, grasp it firmly. Move it in the appropriate direction to
disengage the pin(s), then in the appropriate direction to extract the reserve
from the harness. If spiraling, throw the reserve with gusto past your feet,
i.e. out from the center of rotation. If deep stalled or helicoptering,
throw the reserve up at 45 degrees in the reverse direction of any residual
lateral motion. If the reserve opens, disable the main by pulling on both B
risers. Not brakes and not D risers. Do not gather the wing in towards you as it will help to reduce oscillation if left out. If
brought in it will increase descent rate and oscillation. If the reserve has
failed to open give the bridle a jerk then immediately release it. If still no
joy pull the reserve back to you and throw it again. If still no joy, bring it
to you and get it out of the bag, giving it a shake out if required!
The
Hard Deck.
Whenever you are flying over land, you should
establish a hard deck altitude, below which you will stop messing about or, if
you are in an unstable situation, you will deploy your reserve. I would
recommend no less than 500' and maybe 1000' if you are
cascading.
For this course, we will be operating over
water, so we can be a little more relaxed. I would suggest 300' for both
reserve and silliness!
Pilotage
We aim to get you confident with control of your
glider’s pitch and roll during the course. You will be asked to set up pitching
oscillations and to damp them out (CP TASK) and to make rapid turns and changes
in turn direction (turn reversals) These pilotage
skills are more easily developed in safety during an SIV course than on the
hill at home.
Schedule of SIV
Flights
The following schedule is ideal, but it may be appropriate for some
pilots to repeat certain elements or to leave some elements until a later
course:
Flight 1
Ready Pilots are clipped in & holding
mushroomed gliders! Please unpack
& check your glider promptly on arrival at launch, even if it looks like
there may be a wait for a weather window or some other delay.
Wing-overs (small ones!)
A good way stay in a small thermal on a ridge
when you are too low to thermal.
A good way to lose height in a confined area
(when maintained at small amplitudes.)
A good way to break your ankles when performed
at 10' agl in front of the Dyke…
Induce a sharp turn to the left with brake &
weightshift.
Wait for your glider
to yaw ~90 degrees.
Release the brake & apply opposite brake
& weight-shift.
repeat until sick!
Asymmetrical
deflations (uncountered)
Just reach up, grasp your 'A' riser and throw it
at your knee. Don’t forget to let go of it!
Your glider should simultaneously dive and
rotate 90 degrees or as specified by its DHV rating. It should recover
spontaneously, or as specified by its DHV rating.
Asymmetrical
deflations (countered)
Just reach up, grasp your 'A' riser and throw it
at your knee. Don’t forget to let go of
it!
Counter the turn with opposite brake. You should
be able to counter the turn with only a small amount of brake and continue in a
straight line. Recovery of the deflation may require pilot input - pump the
brake on the deflated side 'down, 1000, up' and remember to make a deep smooth
pull on the control.
Symmetrical deflation
Reach up, grasp both your 'A' risers and throw
them down. Don't forget to let go!
Your glider will momentarily stop. You will
continue ahead of it, dropping. Once your weight is applied to the rear lines,
the glider will spontaneously reinflate.
High performance wings may front horseshoe and
tired or under-laden wings may not recover. A deep application of both brakes,
"down, 1000, release" should sort the problem.
B-line stall
Just reach up, grasp both your 'B' risers firmly
and pull them down towards your shoulders.
If the glider is snaking violently, ease up a
little.
To recover, release them quickly.
Too slow a release may induce a deep stall. If
so, do it again!
Hard Deck
500'
Big Ears & bunny ears
Hard Deck
200'
Make a
safe landing!
Flight 2
Wing-overs (still small ones)
A good way stay in a small thermal on a ridge
when you are too low to thermal.
A good way to lose height in a confined area
(when maintained at small amplitudes.)
A good way to break your ankles when performed
at 10' agl in front of the Dyke…
Induce a sharp turn to the left with brake &
weightshift.
Wait for your glider
to yaw ~90 degrees.
Release the brake & apply opposite brake
& weight-shift.
repeat until sick!
Asymmetrical
deflations (countered)
Just reach up, grasp your 'A' riser and throw it
at your knee. Don’t forget to let go of
it!
Counter the turn with opposite brake. You should
be able to counter the turn with only a small amount of brake and continue in a
straight line. Recovery of the deflation may require pilot input - pump the
brake on the deflated side 'down, 1000, up' and remember to make a deep
smooth pull on the control.
Symmetrical deflation
Reach up, grasp both your 'A' risers and throw
them down. Don't forget to let go!
Your glider will momentarily stop. You will
continue ahead of it, dropping. Once your weight is applied to the rear lines,
the glider will spontaneously reinflate. A deep and
rapid pump and release on both brakes should encourage quicker reinflation. Do not hold the brakes down at all for any
length of time.
High performance wings may front horseshoe and
tired or under-laden wings may not recover. A deep application of both brakes,
"down, 1000, release" should sort the problem.
Search for deep stall
Just reach up, grasp both your 'B' risers firmly
and pull them down towards your shoulders.
Very carefully release them slowly, taking maybe
5 seconds to complete the release.
If your glider deep stalls, you will observe:
1. The absence of airspeed.
2. The glider looks slightly foreshortened and
with the ribs sticking out like a hungry horse.
If this occurs, apply both B risers firmly and
release them quickly. This MUST be done symmetrically. Alternatively push the
front risers away from you to accelerate the wing. This is becoming more common
as performance increases and AoA reduces. Starting with feet in the speedbar
ready to push may be useful.
Hard Deck
500'
Make a
safe landing!
Flight 3
Wing-overs
Induce a sharp turn to the left with brake &
weightshift.
Wait for your glider to yaw ~90 degrees.
Release the brake & apply opposite brake
& weight-shift.
repeat until sick!
Full Stall
An intentional manoeuvre used to escape from
strong lift or recover from an unstable or cascading situation. Remember that
it is better to hit either ground or water in a stall rather than a spiral.
A poor stall recovery could result in a cravat
or if particularly badly executed, you may fall into the canopy. For this
reason, like every other maneuver, the stall is not mandatory.
Take one wrap and smoothly pull both brakes
fully down, keep your arms locked in this position, if necessary holding your
seat base.
If, after the first oscillation or so, the
glider is still thrashing, ease up a little.
To recover:
1. slowly
pre-release a little brake until the wing tips are no longer folded in front of
the wing.
2. release
the brakes (If oscillating, when the glider is at its furthest point forwards)
3. The
glider should surge forwards and dive, gathering airspeed. If the surge is
violent, you can counter as much as necessary to prevent the glider going to
your horizon.
4. Do
not counter so much that the glider re-enters a stall/spin.
Whip Stall
Used to recover cravats and stop cascades
From normal flying speed, initiate a pitch
forwards then vigorously apply both brakes fully and lock your arms.
The glider will pitch back,
then you will swing back underneath it, giving the impression that it has
pitched forwards.
At the point of full forwards pitch release to 30%
brake (You may need to pre-release slightly to recover any front rosette)
Search for Stall
From normal flying speed, slowly apply both
brakes.
As soon as you observe your wing tip(s) begin to
peel back, release the brake.
The glider will pitch forwards and dive to
recover flying speed. If you find the stall you must complete the manouever as for Stall. If you release the brakes with the
wing behind you, you could end up in the wing!
Hard Deck
1000'
Asymmetrical
deflations (countered)
Just reach up, grasp your 'A' riser and throw it
at your knee. Don’t let go of it!
Counter the turn with opposite brake. You should
be able to counter the turn with only a small amount of brake and continue in a
straight line. Recovery of the deflation may require pilot input - pump the
brake on the deflated side 'down, 1000, up' and remember to make a deep smooth
pull on the control. Repeat the exercise allowing modest rotation to occur
before recovering the deflation.
Hard Deck
300'
Make a
safe landing!
Flight 4
Wing-overs (larger)
A good way to break your ankles when performed
at 10' agl in front of the Dyke…
Induce a sharp turn to the left with brake &
weightshift.
Wait for your glider
to yaw ~90 degrees.
Release the brake & apply opposite brake
& weight-shift.
repeat until sick!
Hard Deck
1000'
Search for Flat Spin
Typically occurs when thermalling
just a little too optimistically. You are flying very slowly with a high rate
of turn and try to make the glider turn too tightly. You experience a 'skidding
on ice' sensation as the inside wing drops back.
To search, slow the glider to just below minimum
sink rate. Then apply a steadily increasing rate of turn.
Immediate release of the inside brake will allow
the inside wing to recover normal flight.
Holding brake input for too long will allow a
helicopter or flat spin to develop.
To recover from this, if the glider is
oscillating, wait for it to reach its furthest point forwards then release the
brakes to 1/3 position. If the glider is not oscillating release the brakes to
1/3 position, but expect a more vigorous dive, which may require countering.
Option: stall recovery from flat spin
Hard Deck
1000'
Amp Max Spin
Typically occurs when avoiding a mid-air. You
are flying fast when you make a large brake input and maintain it. You will
feel the braked wing peel back, your glider will begin
to rotate.
To mimic, just fly fast, make a large brake
input and maintain it.
Allow your glider to make a 180
degree course change then release the brake.
The glider should surge forwards and dive,
gathering airspeed. If the surge is violent, you can counter as much as
necessary to prevent the glider going below your horizon.
Do not counter so much that the glider re-enters
a stall/spin
Hard Deck
1000'
Asymmetrical
deflations (countered)
Just reach up, grasp your 'A' riser and throw it
at your knee. Don’t let go of it! Allow
a turn to develop.
Then counter the turn with opposite brake. You
should be able to counter the turn with only a small amount of brake and return
to flying in a straight line. Recovery of the deflation may require pilot input
- pump the brake on the deflated side 'down, 1000, up' and remember to make a deep
smooth pull on the control.
Turn Reversals
Gradually build up turn reversal rate avoiding
spin:
Perform a rapid spiral entry to the right, then level the controls, as the swing through commences,
perform a rapid spiral entry to the left, &c.
Hard Deck
300'
Make a
safe landing!
Flight 5
Wing-overs (larger)
Induce a sharp turn to the left with brake &
weightshift.
Wait for your glider
to yaw ~90 degrees.
Release the brake & apply opposite brake
& weight-shift. Repeat.
Accelerated
asymmetrical deflations
(countered)
Apply full speed bar, reach up, grasp your 'A'
riser and throw it at your knee. Don’t
forget to let go of it!
Release the bar.
Counter the turn with opposite brake. You should
be able to limit the turn to 90 degrees or as specified in your DHV cert. DON'
T STALL THE FLYING SIDE
Recovery of the deflation may require pilot
input - pump the brake on the deflated side 'down, 1000, up' and remember to
make a deep smooth pull on the control.
On high performance wings, this can result in a
cravat…
Accelerated
symmetrical deflations
Apply full speed bar, reach up, grasp both your
'A' risers and throw them at your knees. Don't forget to let go!
Release the bar.
Your glider will momentarily stop. You will
continue ahead of it, dropping. Once your weight is applied to the rear lines,
the glider will spontaneously reinflate.
Spiral Dive
The old way:
Induce mild wingover.
Apply inside brake and maintain turn direction.
Steadily apply more brake as you feel increased
g loading.
Glider 'locks in' when at your horizon.
Steadily apply more brake as you feel increased
g loading.
glider rotates to face towards the sea.
The new way:
Start from straight and level flight and mid
brake applied. Weight shift and apply one brake to minimum manouevering
speed and the other to full hands up, all simultaneously. Spiral entry will be
much quicker.
To recover:
Reduce the applied brake to allow the glider to
rotate back to face horizon.
Hold in this 'tight 360' until excess energy
dissipated.
Carefully reduce turn rate until flying straight
& level.
You will be somewhat disoriented and may not be
able to tell if your glider is flying normally. Assume that it is! Normality
will return after a few seconds.
Hard Deck
500'
Recover
senses!
Make a
safe landing!
Flight 6
Wing-overs
A good way to break your ankles when performed
at 10' agl in front of the Dyke…
Induce a sharp turn to the left with brake &
weightshift.
Wait for your glider to yaw 180 degrees.
Release the brake & apply opposite brake
& weight-shift.
repeat until sick! Exit by changing it to a spiral dive.
Pitch induced
deflations
This mimics deflations occurring due to poor
exits from other manoeuvers.
Apply positive brake input to pitch glider back.
Release and wait for glider to pitch forwards. When glider reaches its most
forwards point, apply another positive brake input to pitch glider back.
Glider should reach approximately your horizon
behind you before it deflates as it approaches you horizon ahead.
Recover as per symmetrical deflations
(countered)
Spiral Dive
Start from straight and level flight and mid
brake applied. Weight shift and apply one brake to minimum manouevering
speed and the other to full hands up, all simultaneously. Steadily apply more
brake as you feel increased g loading.
glider rotates to face towards the sea. Then release inside brake. Glider
should dive harder.
To recover, apply brake to slow the wing then
add asymmetry to allow the glider to rotate back to face horizon.
Hold in this 'tight 360' until excess energy
dissipated.
Carefully reduce turn rate until flying straight
& level.
You will be somewhat disoriented and may not be
able to tell if your glider is flying normally. Assume that it is! Normality
will return after a few seconds.
Hard Deck
500'
Make a
safe landing!
Optional
extras:
Spin to
stall
Stall
from spiral
Reserve
deployment